There lots to know about Eloqua's Contact Washing Machine - and we have you covered, from cleaning your data to building a successful program with it ... and a few need-to-knows about cloud apps vs. data tools.
Let's jump in and ensure you're more ready to leverage this powerful tool!
Want a clean instance with optimized reporting, campaigns, and integrations? Our Eloqua consultants are ready to help - we have a team dedicated to it!
Click to jump to a section:
How to normalize fields in your Eloqua Contact Washing Machine
Dirty data can cause turmoil in your Eloqua instance. Data cleansing is a common pain point for most marketers today, but it impacts every aspect of your job including segmentation, lead scoring, reporting, and building great campaigns. How do we solve the issue of dirty data in an automated fashion without monopolizing your entire day?
Contact Washing Machines are a great tool that automates this process and continues to clean your database as new contacts or field values enter the system. It's easy to use!
Here, I'll walk you through how to cleanse your Country data, but you can apply similar logic to any field within your database.
Normalize Country field with a Contact Washing Machine
First, you’ll need to export your entire database with the Country and State/Province fields included in your export view. Once the file is exported, use pivot tables to determine how many different variations of the Country value for United States are currently in your database. Repeat this step for the State/Province values. These “dirty” values will be needed when creating the Data Cleansing File.
Create a Data Cleansing File
The next step is to create a new CSV file that will contain all “dirty” values in one column and the normalized values in the next column over (same row). In the example provided below, the left column includes the numerous “dirty” values used for United States. The right column indicates the “normalized” value. We’re going to replace dirty (existing) values with the normalized (new) value. The same process will be used for any other field you want to clean in your database.

These values will be used to create the lookup table that the update rule will reference to clean the database.
An update rule is a data tool used for data cleansing and normalization of Contacts, Companies, Prospects, or Custom Objects. Here we will create an update rule to normalize a contact field (Country) based on a lookup table field.
A lookup table is simply a list of two columns of values, one column for values to perform the lookup on, and one for values that will be used to replace the original values.
Create a Lookup Table that will be used in the Update Rule:
- In Eloqua, go to Audience > Tools > Data Tools
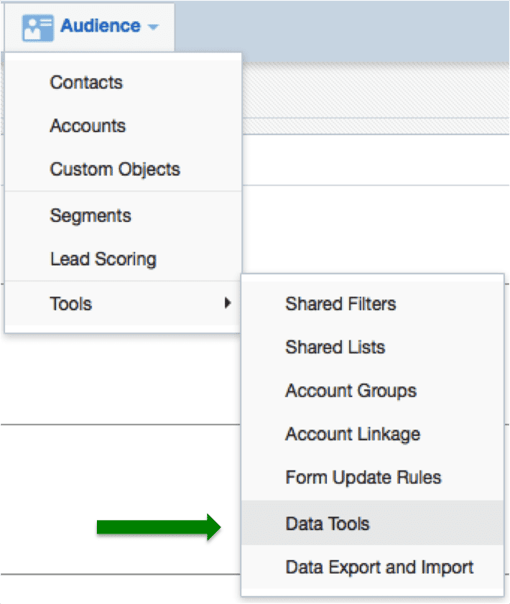
- Click the Data Tools menu, and then click New Lookup Table.

- Enter an appropriate Display Name such as Normalize Country.
- Enter an appropriate description (optional).
- Enter a Lookup Value Column Name. This is the name of the column of field values that you are replacing, for example, Country.
- Enter a Replacement Value Column Name. This is the name of the column of field values that will replace the original field values, for example, Normalized Country.
- Click Save.
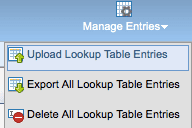
Add values to the lookup table manually by entering the lookup value, the replacement value, and then clicking Add. You may also upload entries from an existing file by going to Manage Entries > Upload Lookup Table Entries. A new Upload Wizard screen will open.
- Give the upload a name, for example Country Data Clean Up then click Next
- Select the file you want to upload and click Upload and Preview Data then click Next
- Make sure the Source field (which is your .xls headings) match your Target Field (Lookup Value Column Name and Replacement Value Column Name) then click Next
- Click Finish
- Click Save.
Create an update rule to use the created lookup table:
- In Eloqua, go to Contacts > Data Tools.
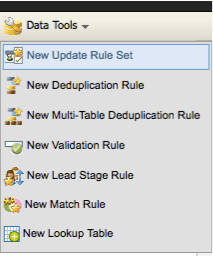
- Click the Data Tools menu, and then click New Update Rule Set.
- Enter an appropriate Update Rule Set Name, such as Normalize Contact Country.
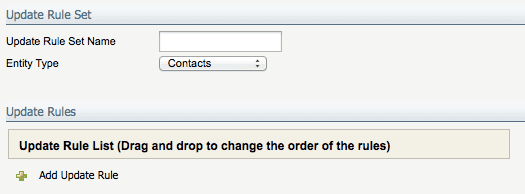
- Select Contacts as the Entity Type.
- Click Add Update Rule.
- Click the Select a field to update field to open the Contact Field Search window, and then search for the contact field that you want to normalize.
- Select the field and then click OK.
- From the Select an update action list, select Overwrite value from Lookup Table Field.
- Make sure that the field that you are normalizing is selected in the Select a lookup field list.
Note: This will perform the lookup on a different field than it is replacing. This will retain the original field. - Click the Select a lookup table field to open the Lookup Table Search window, and then search for your created lookup table.
- Select the lookup table and click OK.
- Select Overwrite if lookup value not found to set a static value if the lookup value is not found in the lookup table. We have left this unchecked.
- Click Apply, and then click Save.
Now you’ve built all the pieces needed to create the Program to automate this process!
Build an Eloqua Contact Washing Machine Program
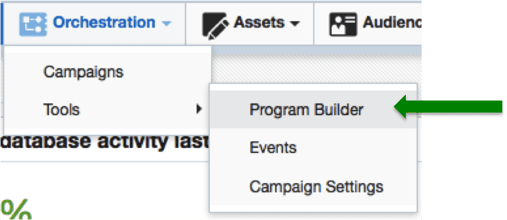
- In Eloqua, go to Orchestration > Tools > Program Builder
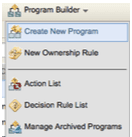
- Click the Program Builder menu and select Create New Program
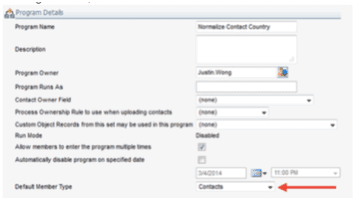
- Enter an appropriate program name, such as Normalize Contact Country
- Change the Default Member Type field to match the Entity Type of the Update Rule that you created. In these Washing Machines, we have selected Contacts
- Click Save
- Click Edit Program Flow
- Click Click here to add the first step in the program to create a start step. In this Washing Machine, we have named the step 000 – Start
- Note: Try to use a number naming systems for the steps. This will create a smooth flow and help with editing step paths

- Click Save and Continue
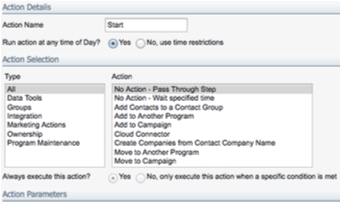
- Enter an Action Name and select the action No Action – Pass Through Step
- Click Save and Close
- Click the arrow on the start step and select Edit Step Path

- Select Send to a new step and then click Continue
- Enter a step name. This is the step where we will use the update rule. In this example, we will name the step 001 – Normalize Country
- Click Save and Continue
- Enter an Action Name and select the action Run Update Rule Set
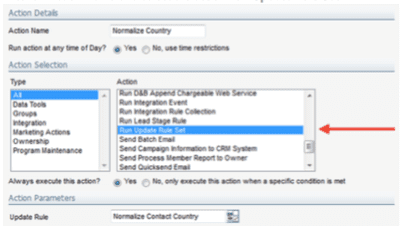
- Click the blank field next to update rule to open the Update Rule Set Search window, and then search for your update rule. In this example, we search for Normalize Contact Country
- Select the update rule and click OK
- Click Save and Close
- Click the down arrow on the Run Update Rule Set step and select Edit Step Path
- Select Send to a new step and then click Continue
- Enter a step name for the exit step. In this example, we will name the step 999 – Exit
- Click Save and Continue
- Enter an action name and select the action Remove from Program
- Click Save and Close
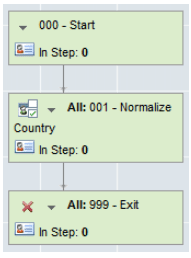
The resulting program should look similar to this:
Manage Picklist Values
Once the database has been cleaned, it will be important to use picklists on forms and consistent values when importing new contacts through list purchases.
- Click Settings > Setup > Manage Picklists
- Find the picklist for the contact field, in this example it’s Country
- Click on the name of the picklist
- Click the caret (^) beside Option Value
- Edit Option
- Delete Option

- To add a new choice, fill in both boxes under Add Value Choice
- Option Value > What is written to the contact record
- Option Name > What is displayed in the dropdown picklist
- Arrange the order by using the red arrows to the right
- Note: this is the order they will appear in the dropdown picklist
Create a New Picklist
- Click Settings > Setup > Manage Picklists
- In the upper right hand corner, click Select List > New Select List
- Add a Name for the Picklist
- To add a new choice, fill in both boxes under Add Value Choice
- Option Value: What is written to the contact record
- Option Name: What is displayed in the dropdown picklist
- Arrange the order by using the red arrows to the right
- Note: this is the order they will appear in the dropdown picklist
Upload a list of Values and Names
- Create a .csv file that contains 2 columns: one for Value and one for Option. Add corresponding headers
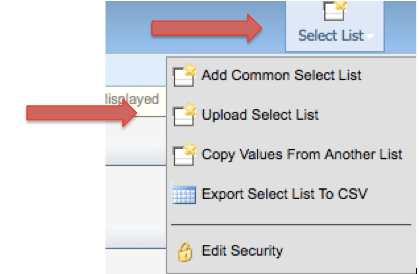
- In the upper right hand corner, click Select List > Upload Select List
- Name the file and click Next
- Click Browse and search for .csv file
- Click Upload and Preview and then click Next
- Map the correct fields Option Name > Option Name and Option Value > Option Value
- Click Next
- No actions on this page, click Next
- Enter your email address to receive the notification when the prospects have been uploaded. This is good to double check there were no errors.
- Click Next
- Click Finish
Create a Program Feeder
Program feeders are important to automating this process. It is important to determine who should enter this program and how they get added. There are multiple ways a contact can enter:
- Form submission processing step
- Members of shared list
- Members of shared filters
- Manual entry
Here is how to set this up:
- Click Orchestration > Tools > Program Builder
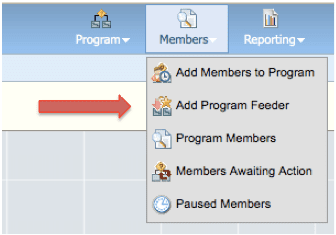
- Click Members > Add Program Feeder
- Add members to Program Step > 100. Start
- Set program feeder name > Country Normalization
- Select source of program members > Contacts in Filter
- Choose the contact filter > SYSTEM: Country – Country Matches Picklist
- Set Evaluation > Every Day is recommended so it doesn’t bog down the database
- Click Save and Close
For this program, it is recommended that all contacts who do not match the picklist flow through this program daily since this is only cleaning one field. If this program is cleaning multiple fields, then you will want all contacts to flow in daily. We will set this up using a Shared Filter next.
Create a Shared Filter
- Click Contacts > Shared Library > Shared Filters
- Find your SYSTEM folder, click Add a New Filter
- Rename your filter "SYSTEM – Country Matches Picklist”
- In the right column, double click Compare Contact Fields
- Double click Compare Contact Fields in the left column to configure
- Select contact field, Country in this example
- Check the box for not
- Select in picklist from dropdown
- Choose picklist that contains the normalized Country values
- Click Save
Activate the Program
- Click Program > Activate.
- Select which mode to run the program in (Standard is recommended)
Testing the Program
Testing is a very important step in creating anything that will affect and change data in your database.
- Create an import file that contains test email addresses and uses values from your dirty data for Country. Make sure to add header rows in this file. You also want to make sure to test for every scenario to validate they are all working properly.
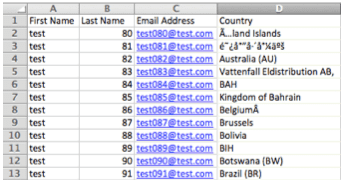
- Upload the test file (.xlsx or .csv) by clicking Contacts > Contacts > Upload and following the wizard
- Make sure to note the name of the shared list these test contacts create
- Click Settings > Setup> Program Builder > Your Contact Washing Machine
- Click the drop-down arrow on the Start step and select Add Members to this step
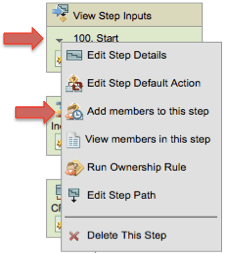
- In the wizard, select Contact Group under the “Choose Source” section, click Continue

- Select your test contacts Shared List. Click Continue

- Click Program > Activate and select your Run Mode
- Check back after all the test contacts have ran through the program to ensure each contact was cleaned correctly
Once you have verified your test data, your Contact Washing Machine Program is ready to run and clean your Eloqua database in an automated fashion!
Contact Washing Machine Data App vs. Cloud Apps
Since the deprecation of the Eloqua Cloud Connectors, many customers have been trying out the new Cloud Apps to replace functionality as well as discover new tools now available. One of the new cloud apps is the Contact Washing Machine App. I’ve seen a lot of conversation on Topliners around the functionality of this new app.
This app has a lot of (cool!) features combined into it, yet it still lacks some ability to fully replace using data tools.
Here's a guide of when to use which method based on what you’re trying to accomplish.
Standardize case on Contact Fields: Contact Washing Machine App
There are actions within the app that allow you to convert text to lowercase, uppercase or proper case.
Blank out a Field on Contact Record: Either!
This is something that is easily doable using both the app and data tools. If your instance doesn’t have access to data tools, you can use the free app. If your instance does have access, you could use update rules on the program canvas or program builder.
Using Lookup Custom Tables: Data Tools
The app only allows you to use the three out of the box lookup tables that have been configured in the app. If you have custom values you would like to map or additional fields, it will only be available using data tools.
Standardize Custom Data Object (CDO) Fields: Data Tools
Unfortunately, as of now, the app only will allow you to update contact fields. If you store additional information in a CDO, you will need to use data tools to update and standardize these fields.
Quickly Standardize Level or Role based on Title: Contact Washing Machine App
The app has these lookup tables with commonly used logic to help standardize and populate these fields without asking for them on a form. The downside, these lookup tables cannot be edited.
Standardize fields other than Level, Role, Gender: Data Tools
If you’re looking to standardize fields such as state or country, these are not yet available in the app and can only be standardized using data tools.
There you have it. These are the most commonly requested standardizing requests that I get from my clients. I would love to know if there are any other scenarios where you would be curious what my recommendation is for which tool to use.